목차

Templates 무료 예제 다운(Download) 받기
우선 Bootstrap으로 만든 HTML 무료 예제를 다운 받습니다. 이번 예제에 사용할 Template는 아래 링크에서 가져 왔습니다.
https://startbootstrap.com/template/simple-sidebar
Simple Sidebar - Bootstrap Sidebar Template - Start Bootstrap
Like our free products? Our pro products are even better! Go Pro Today!
startbootstrap.com
심플한 디자인이고 각 각 하나의 HTML, JS, CSS 파일로 구성되어 있습니다.
"startbootstrap-simple-sidebar-gh-pages.zip" 파일을 받아서 압축을 풉니다. 아래와 같이 구성되어 있습니다.

Visual Studio에서 flask(Python)에 맞춰서 폴더 만들고 연동하기
일반적인 flask 폴더 구성은 아래와 같습니다.
/templates
/static
main.py
앞서 다운 받은 파일을 아래와 같이 폴더에 넣습니다.

index.html의 파일 내용은 아래와 같습니다.
<!DOCTYPE html>
<html lang="en">
    <head>
        <meta charset="utf-8" />
        <meta name="viewport" content="width=device-width, initial-scale=1, shrink-to-fit=no" />
        <meta name="description" content="" />
        <meta name="author" content="" />
        <title>Simple Sidebar - Start Bootstrap Template</title>
        <!-- Favicon-->
        <link rel="icon" type="image/x-icon" href="assets/favicon.ico" />
        <!-- Core theme CSS (includes Bootstrap)-->
        <link href="css/styles.css" rel="stylesheet" />
    </head>
    <body>
        <div class="d-flex" id="wrapper">
            <!-- Sidebar-->
            <div class="border-end bg-white" id="sidebar-wrapper">
                <div class="sidebar-heading border-bottom bg-light">Start Bootstrap</div>
                <div class="list-group list-group-flush">
                    <a class="list-group-item list-group-item-action list-group-item-light p-3" href="#!">Dashboard</a>
                    <a class="list-group-item list-group-item-action list-group-item-light p-3" href="#!">Shortcuts</a>
                    <a class="list-group-item list-group-item-action list-group-item-light p-3" href="#!">Overview</a>
                    <a class="list-group-item list-group-item-action list-group-item-light p-3" href="#!">Events</a>
                    <a class="list-group-item list-group-item-action list-group-item-light p-3" href="#!">Profile</a>
                    <a class="list-group-item list-group-item-action list-group-item-light p-3" href="#!">Status</a>
                </div>
            </div>
            <!-- Page content wrapper-->
            <div id="page-content-wrapper">
                <!-- Top navigation-->
                <nav class="navbar navbar-expand-lg navbar-light bg-light border-bottom">
                    <div class="container-fluid">
                        <button class="btn btn-primary" id="sidebarToggle">Toggle Menu</button>
                        <button class="navbar-toggler" type="button" data-bs-toggle="collapse" data-bs-target="#navbarSupportedContent" aria-controls="navbarSupportedContent" aria-expanded="false" aria-label="Toggle navigation"><span class="navbar-toggler-icon"></span></button>
                        <div class="collapse navbar-collapse" id="navbarSupportedContent">
                            <ul class="navbar-nav ms-auto mt-2 mt-lg-0">
                                <li class="nav-item active"><a class="nav-link" href="#!">Home</a></li>
                                <li class="nav-item"><a class="nav-link" href="#!">Link</a></li>
                                <li class="nav-item dropdown">
                                    <a class="nav-link dropdown-toggle" id="navbarDropdown" href="#" role="button" data-bs-toggle="dropdown" aria-haspopup="true" aria-expanded="false">Dropdown</a>
                                    <div class="dropdown-menu dropdown-menu-end" aria-labelledby="navbarDropdown">
                                        <a class="dropdown-item" href="#!">Action</a>
                                        <a class="dropdown-item" href="#!">Another action</a>
                                        <div class="dropdown-divider"></div>
                                        <a class="dropdown-item" href="#!">Something else here</a>
                                    </div>
                                </li>
                            </ul>
                        </div>
                    </div>
                </nav>
                <!-- Page content-->
                <div class="container-fluid">
                    <h1 class="mt-4">Simple Sidebar</h1>
                    <p>The starting state of the menu will appear collapsed on smaller screens, and will appear non-collapsed on larger screens. When toggled using the button below, the menu will change.</p>
                    <p>
                        Make sure to keep all page content within the
                        <code>#page-content-wrapper</code>
                        . The top navbar is optional, and just for demonstration. Just create an element with the
                        <code>#sidebarToggle</code>
                        ID which will toggle the menu when clicked.
                    </p>
                </div>
            </div>
        </div>
        <!-- Bootstrap core JS-->
        <script src="https://cdn.jsdelivr.net/npm/bootstrap@5.1.1/dist/js/bootstrap.bundle.min.js"></script>
        <!-- Core theme JS-->
        <script src="js/scripts.js"></script>
    </body>
</html>
10번 라인을 아래와 같이 수정 합니다.
수정전: <link rel="icon" type="image/x-icon" href="assets/favicon.ico" />
수정후: <link rel="icon" type="image/x-icon" href="../static/favicon.ico" />
12번 라인을 아래와 같이 수정 합니다.
수정전: <link href="css/styles.css" rel="stylesheet" />
수정후: <link href="../static/styles.css" rel="stylesheet" />
69번 라인을 아래와 같이 수정 합니다.
수정전: <script src="js/scripts.js"></script>
수정후: <script src="../static/scripts.js"></script>
main.py 코드를 아래와 같이 작성 합니다.
from flask import Flask, render_template

app = Flask(__name__)

@app.route('/index')
def index():
    return render_template('index.html')

if __name__ == '__main__':
    app.run(port="9999",debug = True)
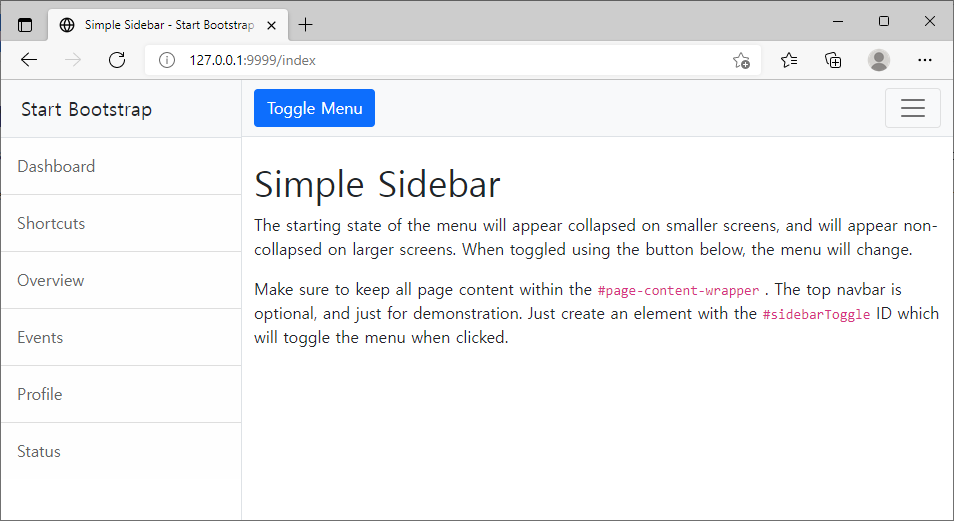
결과 화면>>

Debugging Side Note
이번 예제를 시행하는 과정에서 아래와 같은 에러가 발생하였습니다.
TypeError
TypeError: The view function did not return a valid response. The function either returned None or ended without a return statement.
원인은 아래와 같이 main.py 파일에서 7번 라인에 render_templates 함수 앞에 return을 사용하지 않았습니다. 간단한 실수지만 혹시 비슷한 실수로 실행이 안되는 분들이 있을 수도 있어서 남깁니다.
from flask import Flask, render_template

app = Flask(__name__)

@app.route('/index')
def index():
    render_template('index.html')

if __name__ == '__main__':
app.run(port="9999",debug = True)'웹관련프로그래밍(web programming) > Bootstrap(부트스트랩)' 카테고리의 다른 글
| [Bootstrap]화면 사이즈에 따른 크기 동적 조절(Browser size, width=device-width, @media) (0) | 2023.06.28 |
|---|---|
| [Bootstrap] HTML에 댓글창 추가하기 (0) | 2021.12.05 |
| [Bootstrap]HTML 버튼,라벨,입력창 오른쪽 정렬/배치, 위, 아래 놓기 (0) | 2021.11.05 |
| HTML - Bootstrap 사용해서 공간(레이아웃) 배치하기 (Grid) (0) | 2021.10.13 |
| HTML - Bootstrap 사용해서 공간(레이아웃) 배치하기 (Container) (0) | 2021.10.11 |